#
GOOGLE_SHEETS
Paid feature
The GOOGLE_SHEETS component allows you to read, write, update, and delete data in Google Sheets directly from your barcode scanning workflow.
#
What can you do?
- ✅ Append or Update Rows - Add new rows or update existing ones based on a barcode lookup
- 📖 Get Row - Retrieve all data from a row matching your scanned barcode
- 🔍 Get Cell - Retrieve a specific cell value from a matching row
- 🗑️ Delete Row - Remove rows from your spreadsheet
- 💉 Use Variables - Insert dynamic values using {{ barcode }}, {{ number }}, etc.
#
Setup
#
Step 1: Share your Google Sheet
Before using this component, you need to share your Google Sheet with the Barcode to PC service:
- Open your Google Sheet
- Click the
 Share button
 - Share the sheet with the Barcode to PC service account email:
eagle-eye-systems-n8n@eagle-eye-systems.iam.gserviceaccount.com - Grant edit permissions, even if you only plan to read data

#
Step 2: Add the component
- Drag & drop the GOOGLE_SHEETS component to your Output Template
- Paste your Google Sheet URL into the Google Sheets URL field
- Choose your action and configure the settings
#
Actions
#
Append or Update Row
Use this to add new items to your spreadsheet or update existing ones.
How it works:
- Searches for a row where the Key Column matches your scanned barcode
- If found → Updates that row with new values
- If not found → Adds a new row
Configuration:
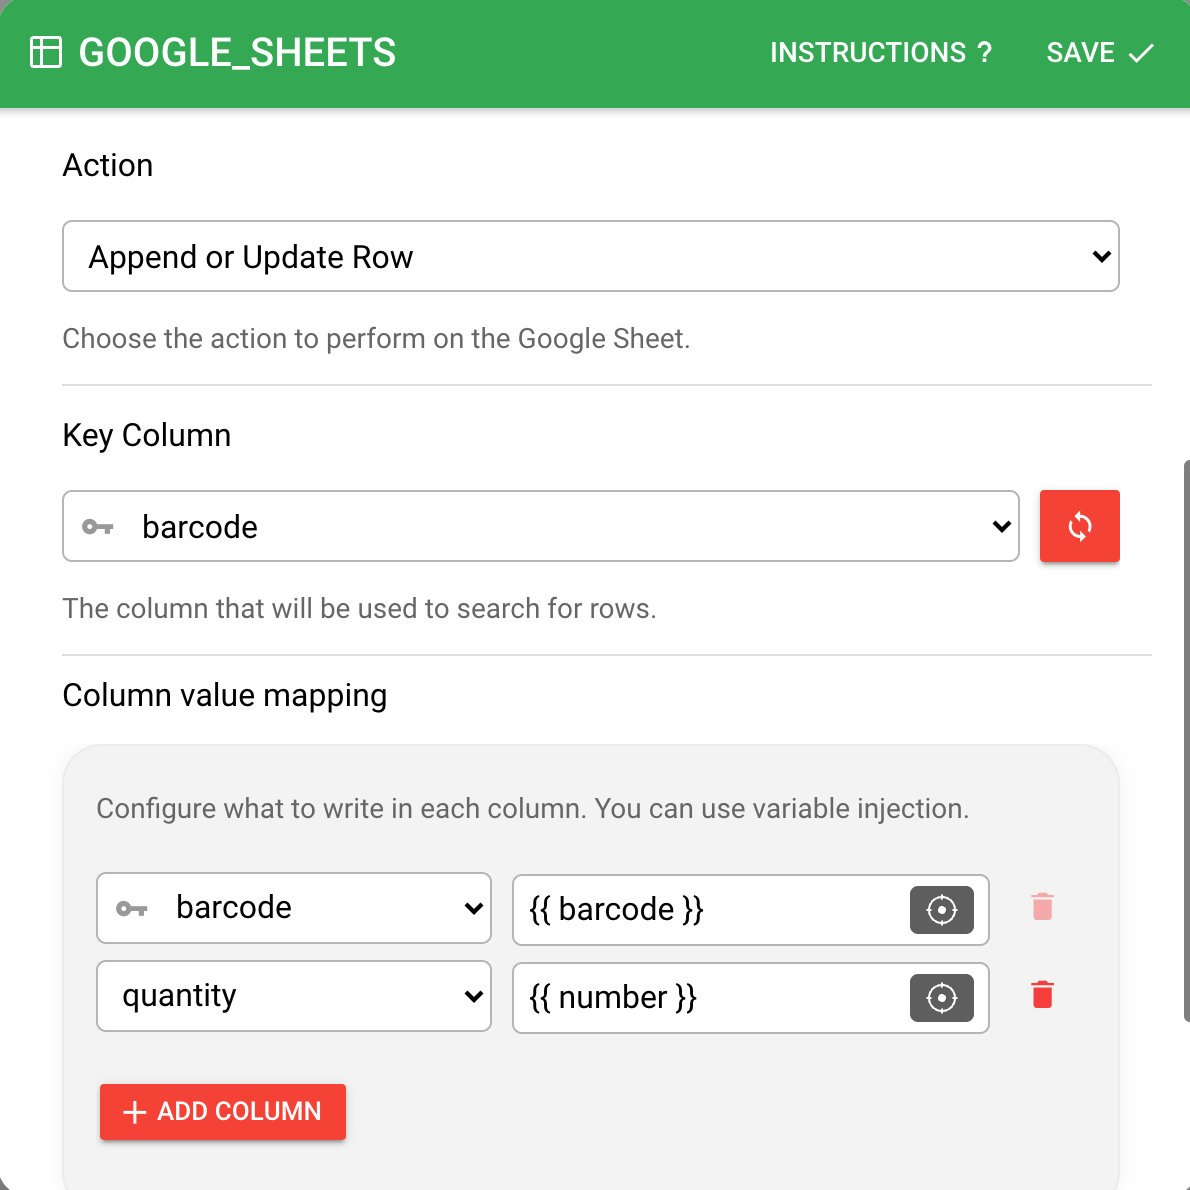
- Key Column: The column to search in (usually your barcode column)
- Column Mapping: Map your spreadsheet columns to values
- Use variables like {{ barcode }}, {{ number }}, {{ date_time }}
- You need at least 2 columns: the key column + one additional column
Example:
Spreadsheet before:
| barcode | product    | quantity |
|---------|------------|----------|
| 12345   | Widget A   | 10       |

Scan barcode "12345" with quantity "15"
→ Row UPDATED to: | 12345 | Widget A | 15 |

Scan barcode "67890" with product "Widget B", quantity "5"
→ Row ADDED: | 67890 | Widget B | 5 |
#
Get Row
Use this to look up product information when scanning a barcode.
How it works:
- Searches for a row where the Key Column matches your scanned barcode
- Returns all column values from that row as variables
- You can use these values in other components
Configuration:
- Key Column: The column to search in (usually your barcode column)
Example:
Spreadsheet has:
| barcode | product  | price  |
|---------|----------|--------|
| 12345   | Widget A | $9.99  |

Scan barcode "12345"
→ Returns: product = "Widget A", price = "$9.99"

Then use in an ALERT component:
"Product:  - Price: "
→ Shows: "Product: Widget A - Price: $9.99"
#
Get Cell
Use this when you only need one specific value from a row.
How it works:
- Searches for a row where the Key Column matches your scanned barcode
- Returns only the value from one specific column
Configuration:
- Key Column: The column to search in
- Column to output: The specific column value you want to retrieve
Example:
Spreadsheet has:
| barcode | product  | price  | stock |
|---------|----------|--------|-------|
| 12345   | Widget A | $9.99  | 50    |

Scan barcode "12345" with "Column to output: price"
→ Returns only: "$9.99"
#
Delete Row
Use this to remove items from your spreadsheet.
How it works:
- Searches for a row where the Key Column matches your scanned barcode
- Deletes the entire row
- ⚠️ Warning: This action is permanent and cannot be undone
Configuration:
- Key Column: The column to search in
Example:
Spreadsheet before:
| barcode | product  | quantity |
|---------|----------|----------|
| 12345   | Widget A | 10       |
| 67890   | Widget B | 5        |

Scan barcode "12345"
→ Row is DELETED

Spreadsheet after:
| barcode | product  | quantity |
|---------|----------|----------|
| 67890   | Widget B | 5        |
#
Key Column
The Key Column is the column used to search for rows in your spreadsheet. It works like a lookup field.
When you scan a barcode, the component searches the Key Column for a matching value and then performs the action on that row.
Example:
If your Key Column is "barcode":

| barcode | product  | price  |
|---------|----------|--------|
| 12345   | Widget A | $9.99  |
| 67890   | Widget B | $5.99  |

Scanning "12345" → finds the first row
Scanning "67890" → finds the second row
#
Variable Injection
You can inject dynamic values in other components using the {{ ERROR }} syntax.
See: Inject variables
#
Real-World Examples
#
Example 1: Inventory Tracking
Update product quantities as you scan items:
- Add GOOGLE_SHEETS component
- Action: Append or Update Row
- Key Column: barcode
- Columns:
barcode→ {{ barcode }}quantity→ {{ number }}last_updated→ {{ date_time }}
Result: Each scan updates the quantity for that product.
#
Example 2: Price Lookup
Display product prices when scanning:
- Add GOOGLE_SHEETS component
- Action: Get Cell
- Key Column: barcode
- Column to output: price
- Add ALERT component
- Message: {{ google_sheets.price }}
Result: Scan a barcode → shows "Price: $9.99"
#
Example 3: Product Registration
Register new products with multiple details:
- Add BARCODE component
- Add TEXT component (for product name)
- Add NUMBER component (for quantity)
- Add GOOGLE_SHEETS component
- Action: Append or Update Row
- Key Column: barcode
- Columns:
barcode→ {{ barcode }}product_name→ {{ text }}quantity→ {{ number }}registered_on→ {{ date_time }}
Result: Complete product information is recorded in one scan session.